Steampunk is a sub-genre of science fiction that typically features steam-powered machinery, especially in a setting inspired by industrialized Western civilization during the 19th century. Therefore, steampunk works are often set in an alternate history of the 19th century's British Victorian era 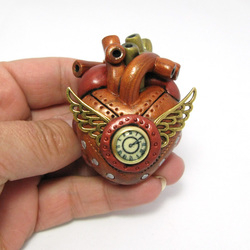 Time Flies - Anatomical Heart Pendant Time Flies - Anatomical Heart Pendant This has been a very big inspiration to me in my work as I love all things steampunk. I love to play around with the colours and the styles and then incorporate them into my sculptures and jewellery. On the left is an anatomical heart which is one of many that I make and more can be found here. Although for many years I actually hated the colour brown the more I fell in love with steampunk the more a grew to love the colours and use them when at all possible. This heart although looks brown is actually copper and bronze and completely hand sculpted from polymer clay. I use all sorts of findings that will embellish my work to make them stand out from the crowd with their uniqueness. 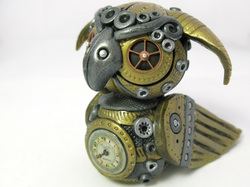 Midas Steampunk Owl Sculpture Midas Steampunk Owl Sculpture I started working with clay about a year and a half ago and as time has passed so has my skills to produce better and more detailed work like my Owl Sculptures.
When I start an owl sculpture I like to firstly decide on the colours, namely two, but may later add a third colour in the after baked detailing process. I like to use colours that have a metal base and a complementing colour, although I have made some from colours that have no metal look to them at all. I also like to embellish my owls with finding that relate to the steampunk genre. Things like watch faces, cogs, gears, keys and such things.This makes them even more striking and also will individualize each piece.
0 Comments
So, you saw some impressive polymer clay works and would like to try some projects yourself. Where shall you begin?
Do not run to a craft store (at least, not yet). Although, there is quite an impressive list of tools and materials you can acquire for this new hobby, you will not need all of them (not right away, at least). This is good news, isn't it? Each little gadget does not cost much, but they add up very quickly. To make it easier for your budget, buy only the tools you need at the moment. How do you decide what you need? First of all, find a project or two that you would like to start with. There are many places on the Internet where you can look for those projects. I would recommend picking one that is graded For Beginners. A project description usually contains a list of tools and materials. Take a good look at this list. You will obviously need some polymer clay. Polymer Clay Most project descriptions avoid mentioning specific brands, yet you will find at least a few different types of polymer clay in a craft store and even more on the Internet. So which ones shall you buy? If you are starting out then I would suggest Fimo soft as this type of clay takes less conditioning than Fimo classic which is a much firmer clay. However if you find that your sculptures and getting squashed to easily, then you will want to change to Fimo classic. Before you go to the store, decide what colours of clay you would like to use for your project. You may have to buy more than one block if multiple colours are required for your project. Keep in mind, however, that different colours of clay may be mixed just as regular paints, so if your project calls for yellow, orange, and red, you can simply buy yellow and red (and mix them to obtain orange). A Work Surface and an Oven Another thing that you will definitely need for any project is some sort of work surface. It is NOT the surface of your dining room table, for at least two reasons – raw polymer clay may stain porous surfaces and it is better to keep it separate from your food. The best surfaces for working with polymer clay are a smooth ceramic tile or a sheet of glass. To complete your polymer clay project, you will have to bake it. This means, you will need something to bake it in – a regular oven will be fine. General Tools and Materials If you are doing other crafts, chances are you already have some of the tools and materials that are required for your first polymer clay project (such as stamps, brushes, mica powders, various paints, etc.). Cross them out from your list. Some other tools may be borrowed from your kitchen or throughout the house. These include knives, spoons, cups, and so forth. However, to be safe, it is wise to designate these tools for polymer clay only, so if you are ready to consider them lost, you may cross them out as well. Now take a look at your list. What is left? Most likely some of the following things. A Pasta Machine and a Roller A pasta machine is used to roll out the clay quickly and accurately. They are the bee’s knees for every polymer clay artist as it saves so much time when a flat sheet of clay is needed. This is a great piece of kit when you cut out a lot of shapes using cutters. If, however, you are savvy and/or not sure about this new hobby of yours, I would suggest getting a roller for now. A good clear plastic roller can be found right next to polymer clay in a craft store. If you decide to buy the machine later, the roller will still be useful, so your money will not be wasted. Shape Cutters There are two main types of shape cutters. The first ones look like cookie cutters. They come in various shapes and sizes and may be found in the polymer clay section in most craft stores. These shape cutters are sold in sets, and the price varies a lot. The others are plunge cutters and are widely used in sugar craft art but work wonderfully with polymer clay Blade(s) Blades for polymer clay are available in craft stores, but for some projects they may be substituted with a disposable cutter from a home improvement store (if there is a handyman in your house, check with him first – I bet he has a few of those already). For safety, I suggest marking the dull side of the blade with some nail polish. Trust me – these things are very sharp, and grasping a wrong end of them is not a good thing. A Ripple Blade Sorry, no substitute for this one. Which can be purchased in a set by Sculpey where you get two ripple blades and two straight edge blades for fine edge cutting? A Clay Extruder (or a Clay Gun) No substitute again. The ones used for cake decorations or in PlayDoh sets will not work (no, I did not try them myself, I just heard about other people's experience). Use: limited to special projects. If you decide to buy one – take my advice and buy a metal, but not a plastic one. Metallic or iridescent acrylic paints (and micas) can be used in the same way as any other acrylic paints. Each person has his or her own favourite brand of paints. Every brand acts a bit differently from the others, so keep looking until you find one you like. Combining different paints can create appealing results; too, they can react with each other and give an effect that you would otherwise find by sticking to the same brand. Some of the good metallic lines are FolkArt and DecoArt, of which I use both plus other brands. You will just need to play with them and see which is better for the purpose you require. Just remember experimenting is always a good way to go as this is the way you will stumble upon something new. If you have mica powders, it is possible to make your own metallic or iridescent paints from them. Just mix a little powder with a squirt or two of water (or any other polymer clay-friendly medium of your choice) until you reach the desired consistency. This can then be painted onto your baked clay to add a wonderful effect. Using the pearl mica powders over painted areas will give a very unique pearl effect that will only be seen as you move the object to catch the light. Using liquid polymer clay to create icing and other types of topping including sauces is a lot of hard work but the end results are fantastic. The technique I use is with a small plate and the back of a spoon and then store any excess clay in a little air tight pot for use later. I use Translucent Liquid Sculpey for this. First of all condition some normal clay (soft is better than classic as it will condition quicker). Then break it up into small pieces, squeeze out some liquid clay and then add the small well-conditioned pieces of clay to your plate (this is where the hard work comes in) and start mixing it with the back of the spoon. You can keep adding small pieces of clay and more liquid clay as you mix it, I like to mix quite a bit then I have lots left for next time I need some. This can then be used for various things liking icing cupcakes of giving a realistic look to blood that you want to stick in certain places like a knife or on the ends of something severed. You can use any colour clay you like and once you have mixed enough you will need to add a small amount of oil paint to make the colour really pop (do this even if you are mixing white). You can’t just use anything to colour the liquid clay but you can use quite I few things. DON'T use acrylic paint it does crazy stuff in the oven and will leave your icing looking like curdled milk. The best thing to use in oil paints but in tiny amounts till you get the colour you want. You can use oil pastels, soft pastel, mica powders; the best by far is oil paints. If however you want your liquid clay to be translucent then use Fimo deco gel. It bakes a lot clearer than the liquid Sculpey and makes for a better sauce or translucent blood. You don’t need to add any solid clay to this just squeeze out the amount you need and mix small amounts of oil paint until you get the colour you require. You can then add this to your creations before you bake them. However you need to remember that this will run and could end up in places you didn’t want it, so place it to the top of you make and then bake them straight away. The clay will begin to bake and run at the same time in the oven and hopefully run exactly where you want it. But if you think about it sauce is a very random pattern when you pour the real stuff, so the more random the clay sauce runs the better the look of your cake, ice cream or whatever you add it too. Hi guys I just thought I would start a blog on my website where I can post things that I have found very useful with good hints and tips on working with polymer clay. I’ve been playing around lately with different paints to improve the metallic look of basic black polymer clay after you have made your item and baked it. I had already bought and been using on my skulls spray paint and decided to go look for some tutorials on spray paints with clay. This is a video I found on how to use spray paints on polymer clay to make them look more metallic or more like realistic antique metal. This is a very good tutorial and even gives you a list of materials you can use below the video. I hope you all enjoy this and get lots of new knowledge for the video and credit the author of the tutorial (KustomFu), for their hard work. |

AuthorI am the Crazy Crafter of Polymer Clay and I live to create the wild and diverse. ArchivesCategories
|
| DevilishDesigns |
|
 RSS Feed
